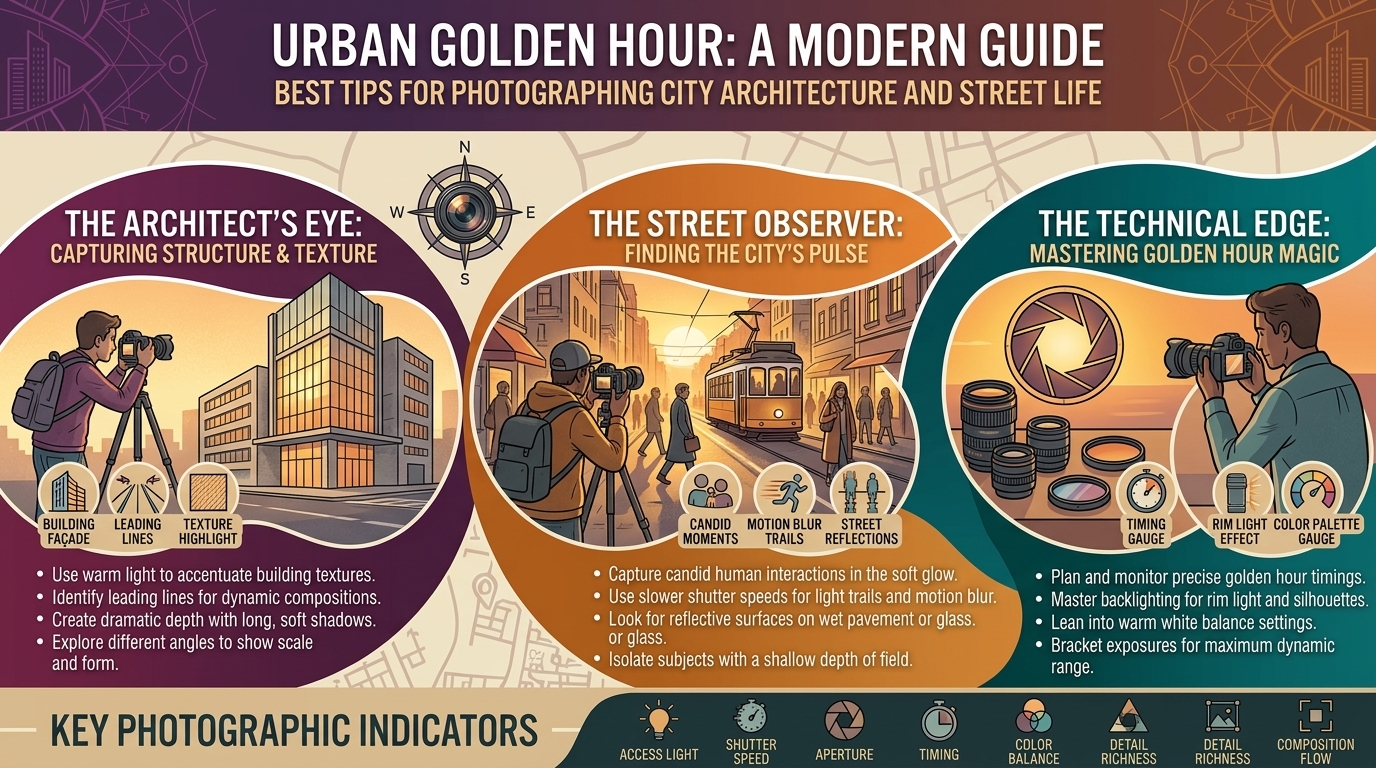
The Best Tips for Photographing Urban Architecture and Street Scenes During Golden Hour
Welcome to nyattitude.com, your ultimate digital destination for urban exploration, street photography mastery, and capturing the authentic soul of metropolitan life. Whether you are framing historic brownstones in New York City, capturing the sweeping tech-and-classic vistas of San Francisco, documenting modern skylines across Washington state, exploring sprawling architectural textures in Texas, or hunting for cinematic shadows on the streets of California, there is one magical window of time that transforms ordinary cityscapes into breathtaking works of art: the golden hour.
Often referred to by cinematographers and photographers as “magic hour,” the brief period shortly after sunrise and just before sunset offers a rare combination of warm, directional light, long dramatic shadows, and a bustling urban rhythm.
In this comprehensive, SEO-optimized guide, we will break down the physics of golden hour light, explore advanced camera techniques, share composition secrets for architecture and street scenes, and provide region-specific tips for major metropolitan landscapes.
The Science of Golden Hour: Why City Light Changes
To capture stunning urban photos, you must first understand how light interacts with the built environment. When the sun is low on the horizon, its light must travel through a much thicker layer of Earth’s atmosphere than it does at high noon.
1. Rayleigh Scattering and Color Temperature
As sunlight passes through atmospheric particles, shorter blue and violet wavelengths scatter in all directions, while longer red, orange, and golden wavelengths pass straight through. This drops the color temperature of your scene down to a warm, inviting glow (typically between 2,000K and 4,000K).
2. The Architectural Transformation
Concrete, glass, brick, and steel react uniquely to low-angle sunlight:
- Glass Facades: Modern skyscrapers in cities like San Francisco or Houston turn into massive vertical mirrors, reflecting fiery orange and pink skies.
- Historic Masonry: Red brick tenements and carved limestone cornices in New York or older Washington neighborhoods catch side-lighting that emphasizes deep textures, cracks, and intricate masonry details.
- Shadow Play: Long, dramatic shadows stretch across asphalt and sidewalks, turning mundane street corners into graphic compositions of light and dark.
Regional Urban Playgrounds: Where to Shoot Across the Map
Every major region offers distinct architectural and cultural backdrops during golden hour:
- New York: The urban canyon effect creates dramatic light shafts on avenues running east-west (think “Manhattanhenge” phenomena), where low sun aligns perfectly with gridiron streets framed by towering skyscrapers.
- San Francisco: Victorian row houses, rolling hills, and iconic landmarks like the Transamerica Pyramid or cable car tracks catch a distinct, warm coastal haze that softens shadows and adds a dreamy cinematic atmosphere.
- Washington: Blending historic government architecture, neoclassical stone columns, and modern waterfront developments along Seattle or regional waterways, offering rich reflections and open skies.
- Texas & California: Expansive sun angles, modern downtown glass towers contrasted with Spanish revival or sprawling suburban-urban transitions, providing vibrant color palettes and vast horizons.
Step-by-Step Guide: Mastering Your Golden Hour Shoot
Capturing dynamic street scenes and towering architecture requires careful preparation. Follow this step-by-step workflow:
      [ Step 1: Scout the Location ]   -->  Use sun-tracking apps to map light angles
                   ↓
      [ Step 2: Camera Setup ]        -->  Set manual white balance & shoot in RAW
                   ↓
      [ Step 3: Frame the Story ]     -->  Incorporate human elements into urban geometry
Step 1: Scout and Arrive Early
Golden hour is notoriously brief—lasting only about 45 to 60 minutes depending on your latitude and season.
- Arrive at your chosen location at least 30 minutes before the official start of golden hour.
- Use a sun-tracking app to see exactly where the sun will dip behind buildings so you don’t find yourself trapped in shadow.
Step 2: Camera Settings and Technical Control
- Shoot in RAW: Urban scenes feature extreme contrast between bright reflective glass and dark street canyons. RAW files capture maximum dynamic range, allowing you to recover shadow details in post-processing.
- White Balance: Avoid using Auto White Balance (AWB), which tries to neutralize warm tones. Set your camera to Daylight or Cloudy to lock in those rich golden hues.
- Aperture & ISO: Keep your ISO low (100–400) to maintain clean image quality. Use an aperture between f/8 and f/11 for sharp architectural depth of field, or open up to f/2.8 if you are isolating a street portrait against a soft, glowing background.
Step 3: Balance Architecture and Street Life
The best urban photos tell a story by combining inanimate geometry with living humanity.
- Use leading lines (such as a bridge span, subway stairs, or the vanishing point of a downtown street) to draw the viewer’s eye into the frame.
- Wait for a pedestrian to walk through a pool of golden light or cast a long shadow across a crosswalk to add scale, movement, and emotion to the composition.
Comprehensive Pro Tips for Elite Urban Photography
- Look Up and Look Back: Photographers often focus straight ahead at eye level. Remember to tilt your camera upward to capture the way late-day sunlight rakes across the top floors and cornices of historic high-rises. Also, turn around—the light striking buildings opposite the setting sun often produces a stunning, soft pink alpenglow.
- Embrace Silhouette and Flare: Don’t always keep the sun behind you. Position a building or a passerby directly in front of the low sun to create striking high-contrast silhouettes or intentional lens flares that add warmth and authenticity.
- Capture the Blue Hour Transition: Don’t pack up your gear the second the sun dips below the horizon. The 20 to 30 minutes after sunset—known as “blue hour”—creates a magnificent color balance where artificial indoor office lights, streetlamps, and neon signs glow warmly against a deep twilight-blue sky.
Frequently Asked Questions (FAQ)
1. Exactly when does golden hour start?
Golden hour occurs during the first hour after sunrise and the last hour before sunset. The exact timing changes daily based on your geographic latitude, season, and local time zone.
2. Should I use a tripod for golden hour street photography?
If you are shooting static architecture with low ISO and small apertures (f/11) to maximize sharpness, a tripod is extremely helpful. However, for fast-paced street scenes where you need mobility to capture candid moments, hand-holding with a fast lens or image stabilization is better.
3. How do I prevent my architectural photos from looking crooked or distorted?
When shooting tall buildings from street level, tilting your camera upward creates “falling lines” (perspective distortion). You can correct this using a tilt-shift lens, stepping further back with a wider-angle lens and cropping later, or fixing geometry in editing software like Lightroom.
4. Why do my golden hour photos sometimes look too orange or muddy?
If your camera’s Auto White Balance (AWB) misinterprets the warm scene and overcompensates, or if you edit with too much global saturation, golden light can turn muddy. Shoot in RAW and adjust white balance manually to keep the light natural and crisp.
5. What focal lengths are best for urban street and architecture photography?
A versatile zoom lens like a 24-70mm f/2.8 is the workhorse for street scenes. For grand architecture or tight architectural details, a wide-angle 16-35mm or a telephoto 70-200mm lens allows you to compress urban elements and isolate distant subjects.
6. How can I find unique street scenes that haven’t been photographed a million times?
Step away from the primary tourist overlooks. Explore alleyways, industrial warehouse districts, transit hubs, and residential neighborhoods where everyday urban life unfolds naturally against interesting architectural backdrops.
7. Is golden hour better in the morning or evening?
Both offer beautiful light, but evening golden hour is usually more popular because the air has accumulated particulate matter throughout the day, often resulting in richer, more dramatic color tones and warmer light.
8. How do I handle harsh high-contrast shadows in city canyons?
Embrace them! High-contrast chiaroscuro lighting is a hallmark of dramatic street photography. Expose for the highlights so the bright areas don’t blow out, and let the deep shadows fall into rich darkness.
9. Can I shoot good urban photos with a smartphone?
Absolutely! Modern smartphones feature advanced multi-lens systems, HDR processing, and RAW shooting capabilities. Tap to focus on the brightest part of the sky to preserve rich golden tones during sunset.
10. What safety precautions should I take when doing urban street photography?
Always stay aware of your surroundings, especially when walking with expensive camera gear in crowded transit hubs or unfamiliar neighborhoods after dusk. Keep one ear free from headphones and secure your camera strap firmly across your body.
Conclusion
Photographing urban architecture and street scenes during golden hour is one of the most rewarding pursuits in visual storytelling. By mastering the science of low-angle light, preparing your camera settings in advance, and balancing grand architectural geometry with authentic human moments, you can capture images that truly resonate. Whether you are framing a bustling intersection in New York or capturing coastal architectural warmth in San Francisco, the golden hour transforms every concrete jungle into a masterpiece of light and shadow.
What is your favorite city or neighborhood to explore with your camera, and do you prefer shooting during morning light or evening sunset?